Our first article on retail arbitrage was received so well that we decided to call Ryan Grant from Online Selling Experiment to give you the exact tools and insanely actionable plan you need to start an Amazon retail arbitrage business in 2019!
Let’s get right down to business….
Ryan was recently featured on CNBC for quitting his job and focusing on retail arbitrage full time, we got a chance to team up with him and he did not disappoint!
In this post you’ll learn exactly how to profit with retail arbitrage from Ryan to finally start selling on Amazon.
Here’s What We’re Covering:
- Starting a Retail Arbitrage Business
- The Amazon Seller App & How to Quickly Figure Out Product Selling Price
- Popular Stores To Source Products For Retail Arbitrage
- Finding Items To Sell Via Retail Arbitrage
- Pricing The Items You Bought Via Retail Arbitrage
- Wrapping This Up…
Starting a Retail Arbitrage Business
The first step in starting with retail arbitrage is setting up your Amazon seller account.
You need an account to access a free app that provides you with the information you need to begin researching items on Amazon.
I recommend signing up for an individual seller account to start because it doesn’t have any monthly fees.
Click here: Open an Amazon individual seller account: Scroll down and sign up as an individual button as shown in this screenshot:

After clicking that link you will go through the process of setting up your Amazon account. Setting up your account should only take a few minutes, and then you will be able to sell products on Amazon.
Look:
GET YOUR ARBITRAGE CHEATSHEET AND FIND HOT OPPORTUNITIES
The Amazon Seller App & How to Quickly Figure Out Product Selling Price
After you’ve setup a seller account, the first thing that I would recommend is to download the Amazon Seller App.
It’s free and directly available through Amazon.
You get details on the selling price, fees, among a few other details, of any product that is available on their website.
This is crazy:
It uses the camera on your cell phone to scan the barcode of any product, and will then show you the pricing and fee information for any item that you are considering selling on Amazon.
If you haven’t yet setup a seller account, then there’s another option that doesn’t require a seller account.
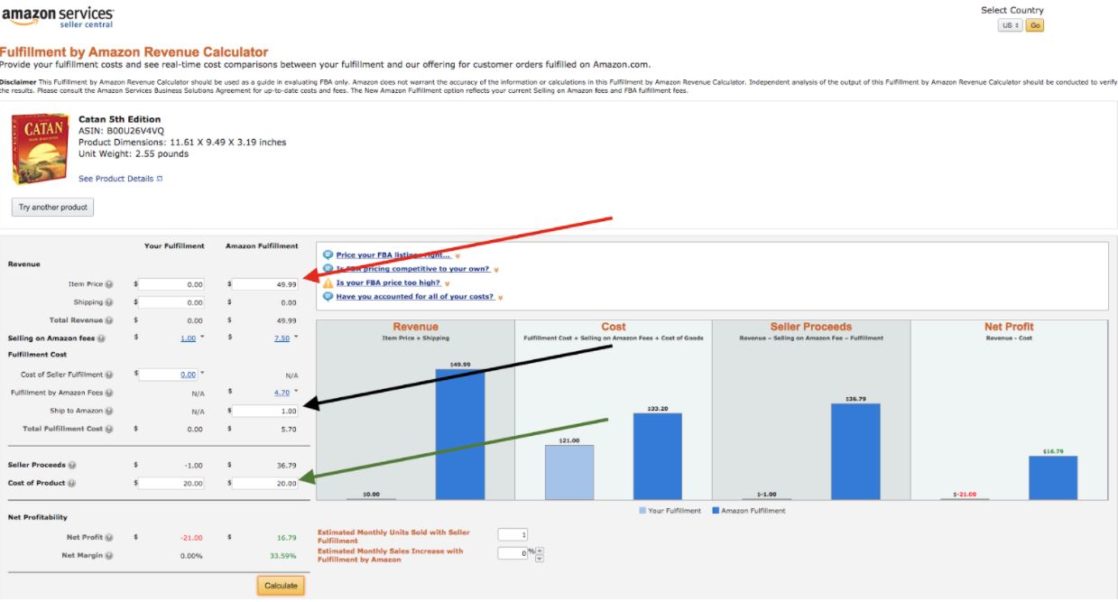
Check out the Fulfillment by Amazon Revenue Calculator and get the fee details on any item. Here’s a look at an example product:
Click image to enlarge
If you go to the Fulfillment by Amazon Revenue calculator, you will be able to search for any item that you are considering selling on Amazon.
Enter the price (red arrow)How much it will cost you to ship to Amazon (black arrow),How much the product costs you (green arrow).
The calculator displays exactly how much you pay in fees, and most importantly at the bottom it lists exactly how much profit you can expect to make on that item.
I recommend running every single item you sell on Amazon through this calculator and the Amazon Seller App.
With calculators like this available, you should know exactly how much you can expect to profit on every item that you sell.
Now it’s time to find some items to sell:
Popular Stores To Source Products For Retail Arbitrage
- Marshall’s
- Ross
- Home Depot
- TJ Maxx
- Staples
- Models’s Sporting Goods
- Gamestop
- Craigslist
- Big Lots
- Outlet Stores
- Local Boutique Shops
Finding Items To Sell Via Retail Arbitrage
Let’s do a quick overview of how to start with retail arbitrage:
- Download the Amazon Seller App
- Create an Individual Amazon Seller Account
- Now we can start looking for products
After you have the app installed, go to a local big box store in your area.
Wal-mart, Target, Home Depot, Toys R Us, Kmart, Walgreens, or any similar store will work. Once you are in a store, look for a clearance section or aisle similar to this:

This example shows a Walmart clearance aisle.
Now:
How to Use the Amazon Seller App
Open the Amazon Seller App, and use your phone’s camera to scan the barcode of the products in the clearance aisle.
After scanning a product, you should see a screen like this:

On this screen you want to check for 2 things right away.
- The first is to make sure you are eligible to sell the product on Amazon under the selling eligibility section.
- The second thing to look at in the left hand corner is the sales rank.
On this particular item we can see that the sales rank is 60 in the toys category, which is an exceptionally good rank.
The sales rank is a piece of information that Amazon provides that gives us an idea of how fast an item is currently selling on Amazon.
A full discussion of sales rank is beyond the scope of this post, but it’s important to know the lower the number the better.
For your first few trips, I’d recommend looking for sales ranks that are lower than 250,000. As you gain more experience you can definitely tweak this, but ranks under this range are a good starting point.
If the app shows that you are eligible to sell the item, and the rank is less than your threshold, then you want to check and see if the item will provide a desirable return on investment.
To do that, click on the arrow on the far right of the app in the “gross proceeds” section. Once you do that you will see a screen like this:

You will be able to enter the selling price, your cost per pound to ship to Amazon (I use $0.50/lb), and how much you can purchase the item for.
In this example, I’m showing that I can buy this item for $10.
Here’s the deal:
You can’t have a business unless you’re profitable.
So our goal is to make sure that we’re selecting products that give us the best chance at a successful business.
Check Your Retail Arbitrage Products Profitability
At this stage there are 2 quick checks that you want to go through.
- The first is to see if the net profit number shown at the bottom is higher than your minimum profit threshold.
- If the item meets your minimum profit threshold, then you will want to calculate a return on investment percentage.
First I recommend setting your minimum profit at around $3 per unit.
This means that you won’t buy any items that you will make less than $3 in profit on.
You’re probably wondering why:Well….having a potential net profit of less than $3 per unit does not allow for very much upside
So, a small drop in price can wipe out your profit.
Now:If the item meets your minimum profit threshold…
calculate a return on investment percentage.
Do this by dividing the net profit by the cost of the item.
In this case it’s $7.13 divided by $10, so the return on investment percentage is 71.3%.
When you start, look for items with a return on investment percentage that is higher than 50%.
This particular item meets all of the criteria for purchasing the item.
For any item that fits all of the purchasing guidelines, I recommend purchasing up to 6 of the item. In this example, if there were 6 copies of this game on the shelf for $10 each, then I would buy all 6 of them.
You may be wondering:
What’s next? Well…
Rinse and Repeat
It’s time to repeat this process on the next item, and the remainder of the items in clearance section.
When starting, I recommend scanning as many items as possible.
As you gain more experience you will likely will be able to avoid scanning certain items that don’t appear viable for resale.
Go through the process of determining an item is viable for resale.
You can quickly move to the next item for any items that don’t fit your buying criteria.
As soon as an item doesn’t fit one of your criteria, move on to the next item.
The biggest problem I’ve noticed is:
How to price items they purchased. Should they price low or high?
Pricing The Items You Bought Via Retail Arbitrage
Now, that we have some items that we want to sell, we need to list them for sale and price them.
When selling on Amazon using the Fulfillment by Amazon program, I recommend pricing at a similar level to the other Fulfillment by Amazon sellers on the listing.
Let’s take a look at an example:

To get to this screen, view all of the available offers for the product.
This can be done by clicking the link that says “used & new (#) from” that will display on just about every product for sale on Amazon. The # field fills with the number of sellers on that particular listing.
Now for the screenshot above, you can see that I filtered the view for only prime eligible items, and items in new condition.
I recommend filtering the view to match the condition and fulfillment method of the item you are pricing.
For the item in the screenshot above, I recommend pricing between $41 and $41.41 if you are looking for a quick sale.
Here’s the deal:
How to Price Your Amazon Products
When pricing your items, I don’t recommend pricing below the offers you are competing with.
Pricing below your competition can often start a chain reaction of lowering prices, and can quickly erode margins.
On the more aggressive side, I recommend matching the lowest price of the same fulfillment method. On the more conservative side, I’d price between $0.01 and 1% higher than the lowest price of the same fulfillment method.
As a bit of a side note, if you are willing to wait awhile for the item to sell, I would price the item between $46.52 and $49.95 in this example.
The reason for this is there are a few different “gaps” in the prices these items are selling for.
Whenever I’m pricing an item I will look for significant gaps in price between the offers, and if there’s a decent gap, then many times I will price at the higher end of the spectrum to see if I can make some additional margin on the product I am selling.
Pricing is something that you will definitely get a better feel for as you gain more experience selling on Amazon, but these general guidelines should be a good starting point.
How to Ship Your Items to FBA Warehouses
I have a full blog post that discusses, step-by-step, how to create your first Amazon FBA shipment. I definitely recommend reading this article if you need help with shipping your items to Amazon.
You can also check out the Startupbros Amazon FBA Guide to teach you the exact steps necessary to prepare, pack and ship your products directly into Amazon FBA.
Best Way to Learn More
We have a huge blog post: The StartupBros Amazon Business Guide that helps you start an Amazon business! 7,000 words that guides you through all the steps involved from optimizing a product listing to figuring out Amazon sales taxes.
And,
Ryan offers a step-by-step course to help you learn how to sell on Amazon with retail arbitrage.
The course is designed to help you build your business from scratch to making $1,000+ in profit per month. It walks you through everything you need to do to become profitable in step by step detail. You can learn more and checkout the course by clicking right below!
Make Your First $1000 per Month Selling on Amazon
Wrapping This Up…
Throughout this post we’ve covered what it takes to get started with retail arbitrage. I’d like to close with a few tips and thoughts from someone who has gone through the process before.
The first thing that I would say is that if trying retail arbitrage sounds good to you, give it a shot! Don’t spend a ton of money on the front end and take your own product photos.
You can test the retail arbitrage strategies that are laid out in this post in just a few hours, and going through that process should be eye opening.
Some people love it, and others can’t stand it. If you dedicate a few hours to it, you’ll know how you personally respond.
The other main thing that I would say is to set realistic expectations. Selling on Amazon, particularly via retail arbitrage, takes some work on the front end.
If you are going to go for it, be willing to put in the necessary work on the front end. The effort can definitely pay off.
So go out there and give it a shot! I’ll be in the comment section waiting to answer every single question you have!
I’m inspired. My plan is to research and “absorb” the information and hopefully profit on the pleasure I get from shopping.
How do you get paid? Paypal?
Hey Virginia, yes, once a month you get paid out via Paypal 🙂
Should one be listing the RA items (from let’s say Walmart) as “used like new” instead of “new”, in order to avoid the IP/authenticity claims from trademark owners that will suspend your account forever (because not being an authorized reseller and as regular retail receipts will be dismissed by Amazon)?
Good post for beginners! This is pretty much what I did when I first started. I took $250 and turned it into $500, $500 into $1200. It was discouraging at first while getting use to the process, but it is doable.
How long did it take you to turn that 250 into 500? from purchase to money in the bank account. I am doing this myself and finding that some items that have low sales ranks are still sitting on the shelf…
I am new I haven’t started yet, I got a question – is it possible you can find product is not listed on Amazon when you scan, you still buy it and can you sell it?
Ryan, please respond.
Can I just go ahead and call bullsh*t? I’m at my 11th store today (I’ve hit most of what you suggested, and some you didn’t), and I finally found my first product that might give me a profit. If it sells (sales rank under 45,000, 4.5 stars), I’ll make about $10, with an ROI of 63%.
ONE item, eleven stores, an entire Saturday, hundreds and hundreds of clearance items scanned, as well as apparently promising non-clearance items. After gas and time spent, I’m in the red. This is not profitable, and you shouldn’t let yourselves be fooled into buying any courses they sell that promise to teach you how to make money doing it. The only people making money from retail arbitrage are the ones selling you a course on how to do it.
This is great post it is almost convincing me but I think you’re right. Are you gonna keep trying though?
I know i’m not Ryan but I think I can help, you honestly have to keep at it. I myself had a slow start, but it is starting to pick up now. When it comes to finding items, there are going to be periods that you will find a lot and some periods when you find diddly… Just have to keep at it and what you put in to it will eventually pay off.
Hey!
Your blog post is great and I want to give this business model a shot, but I am from Germany and cant find any people who are doing retail arbitrage in Germany. On one hand there is a completely new market, on the other hand there is nearly no one I can learn from. Additionally I am a student and can not afford to loose a lot of money or invest in a course. Maybe you have any ideas for me, looking forward to your answer.
Greetings
Malte
Hello all, thanks for all great informations you’re providing us.
I’m in the process of getting my LLC my question is should I join as individual to begin with or professional? I’m also planing to get into private labeling (shipping from china) so in the meantime doing arbitrage. Thanks a lot
hi.
two questions!
1. Can you please help me to understand the APP QR Codes in the Retail Arbitrage Cheat Sheet?
2. The selling eligibility at the APP, let me know if I can list the product without Amazon asking for eligibility purchase?
hi thank you for your effort and your site, which is exellent, I am french, and I am interested by the O / A and the R / A. this article is exellent. you are the best. I have a question a bit complicated.
amazon.fr amazon is seller in a lot of listing, and it is still he who holds the buybox. I find this disloyal because we have to pay 15% on the turnover and amazon is favored, plus amazon is a wholesaler and he has the means to conccurrence toulmonde. amazon manages its prices automatically, and you can never get the buybox.
how to compete amazon in a listing?
Hi. I’m glad I found your post. I like how it’s written to help people understand not to fill our heads with fluff.
I already set up my Amazon seller account today. I started scanning some items but got a little discouraged because they all gave me a warning of being slow moving. I guess this is why not everyone is doing retail arbitrage. It takes time.
My question is: would you recommend a minimum first investment or minimum first shipment amount? I really don’t have a lot to invest.
How do you sell an item that you have in your home? Say I bought a light, didn’t like it and want to sell it o Amazon.
Hey! Very good content! The only thing I’m wondering about is the legality of selling “new” products from a well known brand. I’ve been reading horror stories where many sellers get their Amazon accounts banned because of companies filing complaints. What’s the best way to do this without getting banned?
I keep seeing online that many of the products end up being restricted some how. How does it really end up being worth it in the end? I know the app will tell you if it is but I have also heard that some items just get added after they send it to Amazon or major brands just end up being restricted. I am just looking to add a few hundred dollars a month and not get rich but seeing as how so many items get restricted is saddening.
I”m just JUST starting this. I’m in the research phase right now. I did go out this weekend to do a little pre-shopping to see how it is. I do feel I found some products that could be resold for a profit but it was very few. After hours of shopping I didn’t even find enough to ship in a large box to the warehouse. I’ve been searching how to source products. Have you come across a good area to source products from? I plan on going into Home Decor. Everything on clearance seems very expensive to try to resell.
Hey Tracy, awesome that you went out there and tried! That’s what matters. You would be surprised at the incredible finds you can see at these places.
TJ Maxx
Home Depot
Ross
Marshall’s
Don’t give up. Things like named branded back packs, wine glasses, and typically things that people would be willing to pay a higher price for. Even things like poker sets can be great. It all depends on the store!
This is great thank you. So much information but loving it. I intend to start this as soon as I get my US tax number.
Quick question
I can see the possibility of making a small profit from some products. But going from retailer to retailer, picking up the odd collection of products to sell cannot, surely, make you a decent living? Am I wrong?
Maybe a few bucks here and there. I get that people make good money, but going into retail shops picking up a few products to sell must not be their business model.
Can you say, find a local distributor, buy products in bulk (say a hundred dog collars) and sell on Amazon? Is this allowed?
Thanks
I have been selling on Amazon for over 5 years. In the beginning, I did very well with retail arbitrage. Recently, things have changed on Amazon. If you cannot produce invoices from the manufacturer, you are at risk of suspension. Retail receipts do not work.
Over half of my 7,000 listings have been removed due to being restricted or suspected trademark infringement. A seller must prove they have the right to sell a product. While things seemed easy in the beginning, they are not so easy now.
I would suggest that anyone who wants to make a profitable living on Amazon do lots of research first. It is best to find a wholesale supplier who can provide invoices and a letter if a dispute is ever filed against you. I have read that Amazon may need to contact your supplier if there is any question about one of your products. So it’s best to know this beforehand.
What if I was to use the practices you have pointed out here but buy close outs Or liquidated merchandise and post it as “like new” because it has never been opened !
Thank you
When you indicate find items on clearance does this apply to items for sale too or are we just looking at clearance?
Sale items work too! As long as the products create a significant margin then you can use them for retail arbitrage.
Hello …This is great…BUT..If too many people are doing this whats th point?? I don t want to buy inventory and resell….also how much SEO knowledge does one need?
You don’t need SEO knowledge at all. Don’t put the cart before the horse. Go out and find winning products first. Products that you know have a high return on investment and then learn how to list them on Amazon or even eBay. Once you learn to do that go out and find more products and learn everything improving along the way. Too many people are not doing this, it’s something we believe when we’re hesitant to take action. Most people are busy living their lives and are unwilling to take the risk to improve their lives. Feel free to ask us any question you have and we would love to help you along the journey here!
Hi Ryan
I have the same question as Jason above.
Thanks
Grace
Hey Grace! Just answered Jason! 🙂 Let me know if you have any other questions at all
Hi, me and my wife are interested in starting retail arbitrage in the UK on Amazon using FBA but have read a lot of stories about Amazon asking for invoices to proof authenticity and they are not accepting receipts from shops like Asda (Walmart) etc. Please could you tell me a way around this?
Same question from me! Thanks
Jason, You should absolutely start with retail arbitrage if you’re looking to start selling on Amazon. To answer your question, yes, there have been reports from Amazon and from other re-sellers saying that Amazon has been asking for invoices to prove the items are authentic. The first thing is that not all products are being required to be verified that way. It’s category dependent. For example gated categories like beauty always require invoices but an open category like games won’t. You would need to find products, try listing them and then see what Amazon says. Try it with 1 product and see what happens. It’s very product specific and one work around is listing your products as “Like-New” and not “New” or even listing them as “used” while mentioning in your product description that the product hasn’t been opened. It’s easy to focus on the negative and be discouraged by articles that you read but the only way to know for sure is to start slow and figure out which products are a go and which ones are not.
Joel…
I haven’t started to work actively @sourcing products..
so your information and encouragement are much appreciated
I also find good consistency in the knowledge you’re sharing…gives confidence to me
Thank you very much
Yvonne
I wish you all the best too Yvonne! If you need anything at all please let me know!
I recently quit my job to spend more time at home with my family. I am researching home jobs and stumbled upon retail arbitrage and this site. Question: I really hate shopping (especially WalMart, Target, and the likes). Some say you can do online arbitrage through online shopping. Do you think there’s enough profit in this type of purchasing and reselling on Amazon? Thanks
I’m starting retail arbitrage in 2018! It’s pretty scary but I know that it can be done one step at a time. Thanks Ryan for providing the plan to get started 🙂 I’ll be back with some questions!
Hey James, you got this! Retail Arbitrage has a low barrier to entry and it’s possible to go at your own pace. You don’t need to quit your job and it’s incredible to do it on the side 🙂 Come back and ask questions whenever you got them because we’ll be here I promise!
I’m new to this and am researching ways to make an additional stream of income. I got to the section of profit made and please correct me if I’m wrong, but buying an item for $10 and only making a $7.13 profit…wouldn’t that put you in the negatives because you spent more money to buy the item then making a profit off of it? Did I completely misunderstand that entire section?
Hey Melissa no problem at all, read the section over again after my explanation 🙂
In the section with the explanation of the Amazon Revenue Calculator the game is selling for $26.12 on Amazon and it’s selling in Walmart for $10. After the Amazon FBA fees, Shipping, and $10 for the cost of the game at walmart. You are left with a profit of $7.13.
You are buying the game for $10, selling it for $26.12 and profiting $7.13 clean after the costs of everything, including the cost of the purchase.
In the post we also divided $7.13(Clean profit) /$10 (Cost of the Game) showing that the item 71.3% return on investment.
I hope this makes sense! Please if you have any questions at all or want more explanations please let know and I would love to get back to you 🙂
Ryan – I will re-read what you pointed out above but in net profit, the cost of shipping to buyer’s comes into play of course. What is ideal process (mail, courier?) and do you bundle in delivery costs (how?) or let consumer make choices/arrangements? Also, do you recommend B2C vs. B2B sales? Or larger single sales vs. volume sales?
you need to sell 5 games per hours every day of the week to make $75,000 per year…Stop using % that makes no sense…People want to know what the need to sell to make a living!!
DOABLE????
You need to be able to calculate your return on investment so you can pick winning products and make the most amount of profit possible. No one ever started anything and immediately made $75,000 per year. We don’t teach people how to make money fast, we try to show people how to make money with retail arbitrage effectively. Step 1 is to find one profitable product and understand the process so you can go out and look for product two, three, and so on. It starts with just one product and you move on. There is no way to predict how much people need to sell to make a living because it depends on effort and product selection. If you take the principles we’re teaching in this article and try it yourself you can start making at least extra money on the side to make you believe it’s possible!